


ASP.NET Core is a free, open-source, and cross-platform framework for building cloud-based applications, such as web apps, IoT apps, and mobile backends. It is considered among the top Asp.Net technologies that could make a path-breaking impact.
ASP .NET Core MVC is a Middleware which provides a Framework for building the API and web Application using MVC.
Tooling
- Visual Studio 2017
- Postman
Now let’s Create an ASP.NET Core API application
Follow these steps to create an ASP.NET Core application in Visual Studio 2017
Step 1: Go to File > New, and then select Project.
Step 2: Choose Create a new project.
Step 3: Choose Web API Project template.
Step 4: Select ASP.NET Web Application template.
Step 5: Enter the Project name, and then click ok.
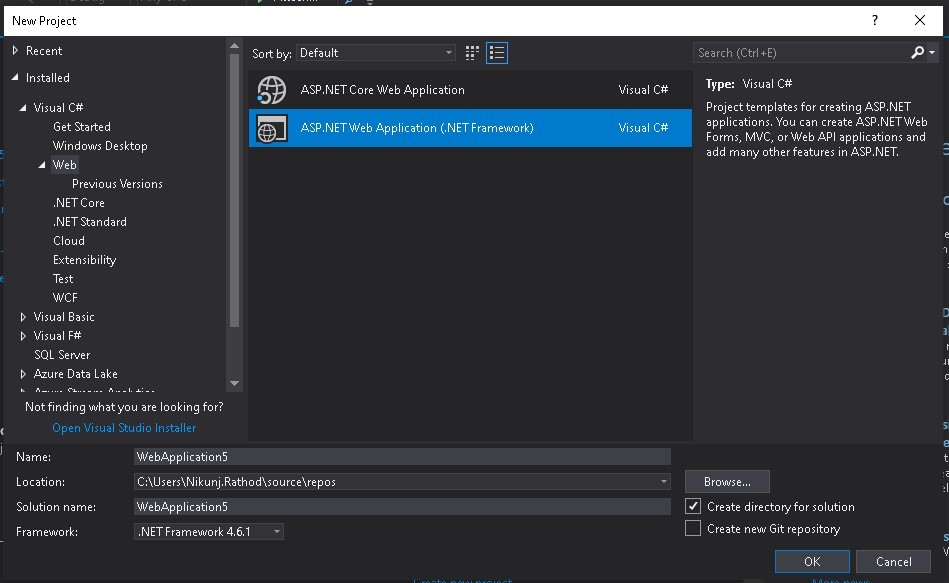 Figure 1: Create a new project
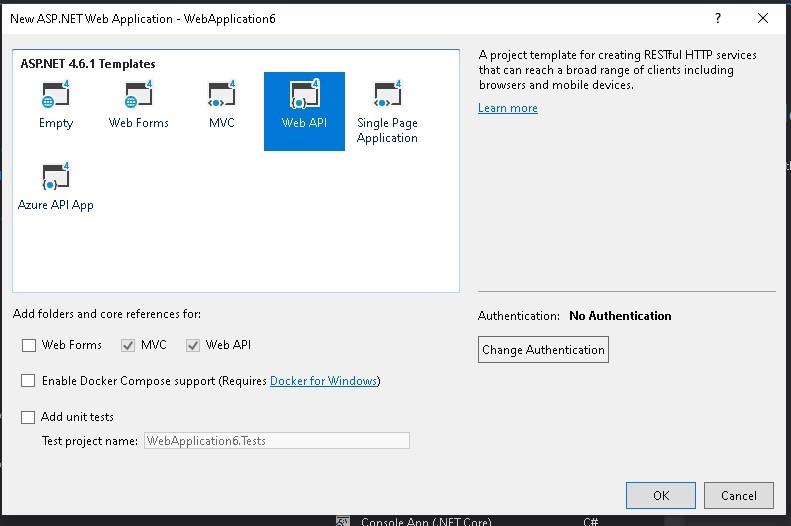 Figure 2: Web API Project Template
When creating a new project, make sure that Authentication is set to No Authentication.
We need to add the reference to the Entity Framework core as follows by installing the package for the database.
We can do this in two ways.
Open package manager console and install following commands.
- EntityFramework
- Microsoft.ASP.NetIdentity.Owin
- Microsoft.Owin.Host.SystemWeb
Right click on the project and select “Manage NuGet Package” and install the packages.
Install this following package
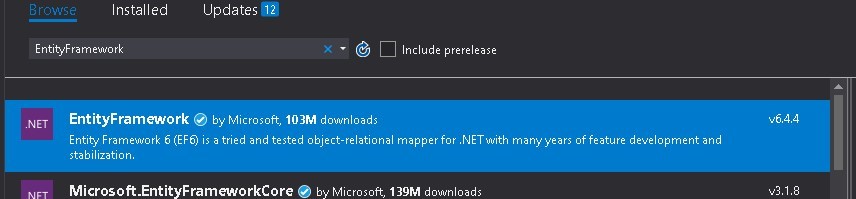 Figure 3: Install EntityFramework package
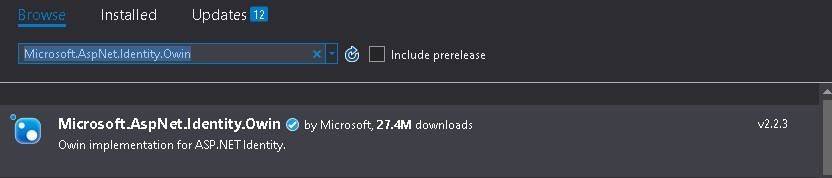 Figure 4: Install Microsoft.Asp.NetIdentity.Owin package
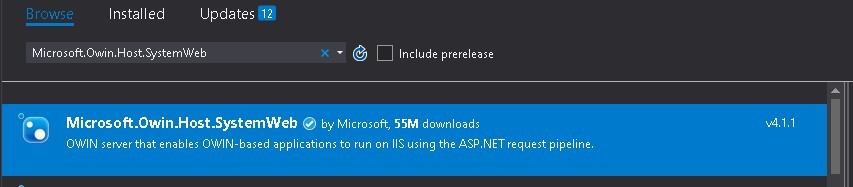 Figure 5: Install Microsoft.Owin.Host.Systemweb package
Let’s create the connection between database and our project
- Tools -> Connect to Database
- It will pop up a window like this.
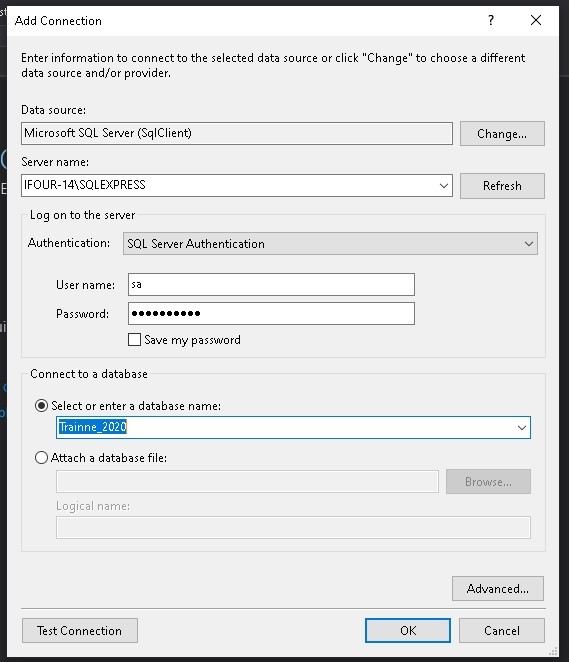 Figure 6: Database Connection
Select your server name and make the Authentication as “SQL Server Authentication”
Select your “UserDB” database.
Now it’s time to create the EF model based on the existing database.
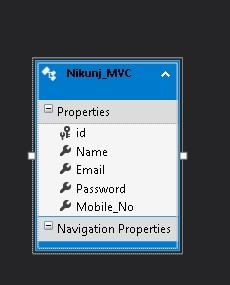 Figure 7: Model
Create a Controller
- Right-click on the Controllers →Add →Controller.
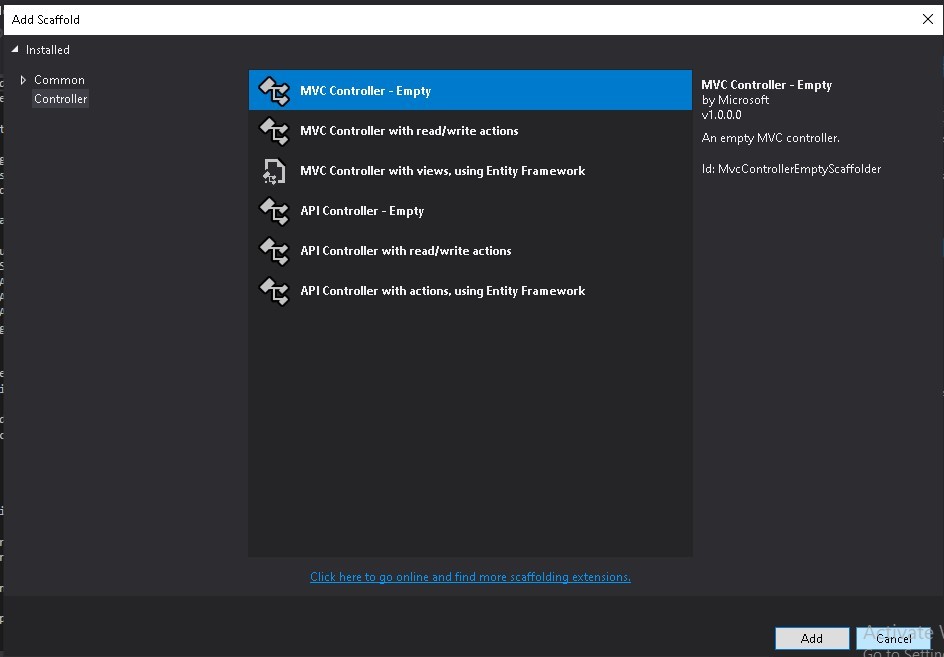 Figure 8: Controller
Now Create StudentController
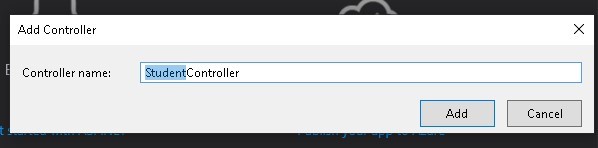 Figure 9: StudentController
StudentController.cs
using Nik_mvc.Models;
using System;
using System.Collections.Generic;
using System.Linq;
using System.Web;
using System.Web.Mvc;
namespace Nik_mvc.Controllers
{
public class StudentController : Controller
{
public ActionResult Index()
{
Trainne_2020Entities db = new Trainne_2020Entities();
List<Nikunj_MVC> obj1 = db.Nikunj_MVC.ToList();
return View(obj1);
}
public ActionResult Edit(int id)
{
Trainne_2020Entities db = new Trainne_2020Entities();
var obj = db.Nikunj_MVC.Find(id);
return View(obj);
}
[HttpPost]
public ActionResult Edit(Nikunj_MVC data)
{
Trainne_2020Entities db = new Trainne_2020Entities();
var data1 = db.Nikunj_MVC.Find(data.id);
data1.Name = data.Name;
data1.Email = data.Email;
data1.Password = data.Password;
data1.Mobile_No = data.Mobile_No;
db.SaveChanges();
return RedirectToAction(“Index”);
}
[HttpGet]
public ActionResult Delete(int id)
{
Trainne_2020Entities db = new Trainne_2020Entities();
var obj = db.Nikunj_MVC.Find(id);
return View(obj);
}
[HttpPost]
public ActionResult Delete(Nikunj_MVC data)
{
Trainne_2020Entities db = new Trainne_2020Entities();
var dd = db.Nikunj_MVC.Find(data.id);
db.Nikunj_MVC.Remove(dd);
db.SaveChanges();
return RedirectToAction(“Index”);
}
public ActionResult Create()
{
return View();
}
[HttpPost]
public ActionResult Create(Nikunj_MVC data)
{
Trainne_2020Entities db = new Trainne_2020Entities();
var cc = db.Nikunj_MVC.Add(data);
db.SaveChanges();
return RedirectToAction(“Index”);
}
public ActionResult Details(int id )
{
Trainne_2020Entities db = new Trainne_2020Entities();
var data = db.Nikunj_MVC.Find(id);
if (data!=null)
{
return View(data);
}
else
{
return HttpNotFound();
}
}
}
}
Create a View
- Right-click on the Method →Add View.
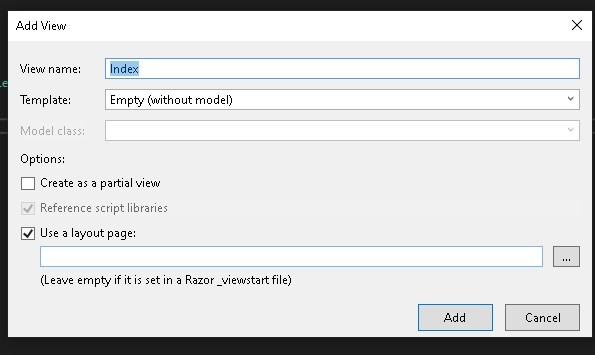 Figure 10: Add View
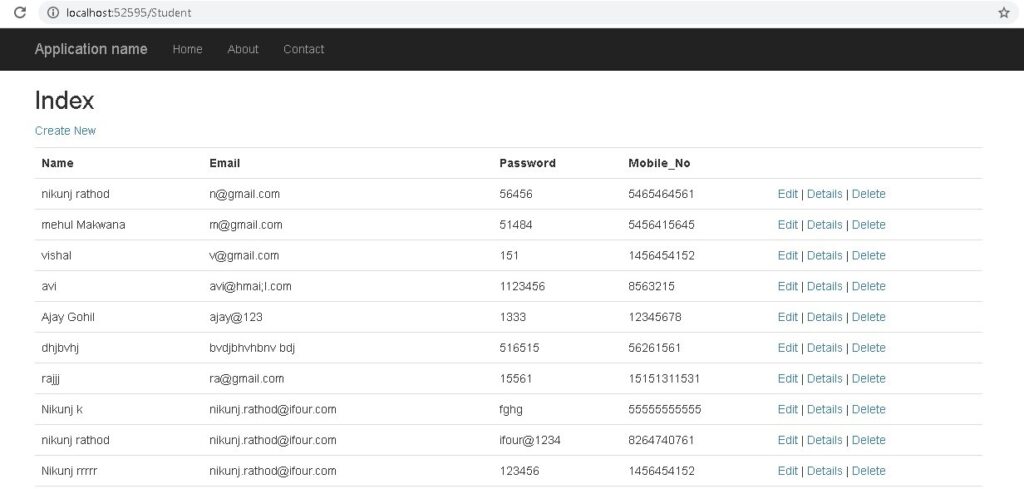
Index.cshtml
In Views/Home/Index.cshtml, replace the contents of the file with the following code to replace the text about ASP.NET and MVC with text about this application:
@model IEnumerable<Nik_mvc.Models.Nikunj_MVC>
@{
ViewBag.Title = “Index”;
Layout = “~/Views/Shared/_Layout.cshtml”;
}
<h2>Index</h2>
<p>
@Html.ActionLink(“Create New”, “Create”)
</p>
<table class=”table”>
<tr>
<th>
@Html.DisplayNameFor(model => model.Name)
</th>
<th>
@Html.DisplayNameFor(model => model.Email)
</th>
<th>
@Html.DisplayNameFor(model => model.Password)
</th>
<th>
@Html.DisplayNameFor(model => model.Mobile_No)
</th>
<th></th>
</tr>
@foreach (var item in Model) {
<tr>
<td>
@Html.DisplayFor(modelItem => item.Name)
</td>
<td>
@Html.DisplayFor(modelItem => item.Email)
</td>
<td>
@Html.DisplayFor(modelItem => item.Password)
</td>
<td>
@Html.DisplayFor(modelItem => item.Mobile_No)
</td>
<td>
@Html.ActionLink(“Edit”, “Edit”, new { id=item.id }) |
@Html.ActionLink(“Details”, “Details”, new { id=item.id }) |
@Html.ActionLink(“Delete”, “Delete”, new { id=item.id })
</td>
</tr>
}
</table>
Output
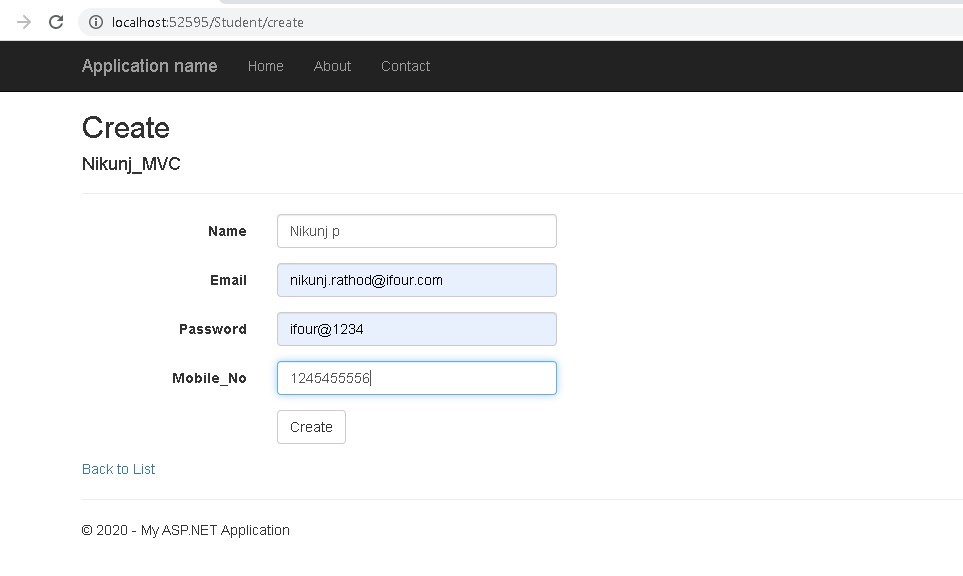
 Create.cshtml
In Views/Home/Create.cshtml, replace the contents of the file with the following code to replace the text about ASP.NET and MVC with text about this application:
@model Nik_mvc.Models.Nikunj_MVC
@{
ViewBag.Title = “Create”;
Layout = “~/Views/Shared/_Layout.cshtml”;
}
<h2>Create</h2>
@using (Html.BeginForm())
{
@Html.AntiForgeryToken()
<div class=”form-horizontal”>
<h4>Nikunj_MVC</h4>
<hr />
@Html.ValidationSummary(true, “”, new { @class = “text-danger” })
<div class=”form-group”>
@Html.LabelFor(model => model.Name, htmlAttributes: new { @class = “control-label col-md-2” })
<div class=”col-md-10″>
@Html.EditorFor(model => model.Name, new { htmlAttributes = new { @class = “form-control” } })
@Html.ValidationMessageFor(model => model.Name, “”, new { @class = “text-danger” })
</div>
</div>
<div class=”form-group”>
@Html.LabelFor(model => model.Email, htmlAttributes: new { @class = “control-label col-md-2” })
<div class=”col-md-10″>
@Html.EditorFor(model => model.Email, new { htmlAttributes = new { @class = “form-control” } })
@Html.ValidationMessageFor(model => model.Email, “”, new { @class = “text-danger” })
</div>
</div>
<div class=”form-group”>
@Html.LabelFor(model => model.Password, htmlAttributes: new { @class = “control-label col-md-2” })
<div class=”col-md-10″>
@Html.EditorFor(model => model.Password, new { htmlAttributes = new { @class = “form-control” } })
@Html.ValidationMessageFor(model => model.Password, “”, new { @class = “text-danger” })
</div>
</div>
<div class=”form-group”>
@Html.LabelFor(model => model.Mobile_No, htmlAttributes: new { @class = “control-label col-md-2” })
<div class=”col-md-10″>
@Html.EditorFor(model => model.Mobile_No, new { htmlAttributes = new { @class = “form-control” } })
@Html.ValidationMessageFor(model => model.Mobile_No, “”, new { @class = “text-danger” })
</div>
</div>
<div class=”form-group”>
<div class=”col-md-offset-2 col-md-10″>
<input type=”submit” value=”Create” class=”btn btn-default” />
</div>
</div>
</div>
}
<div>
@Html.ActionLink(“Back to List”, “Index”)
</div>
@section Scripts {
@Scripts.Render(“~/bundles/jqueryval”)
}
Output
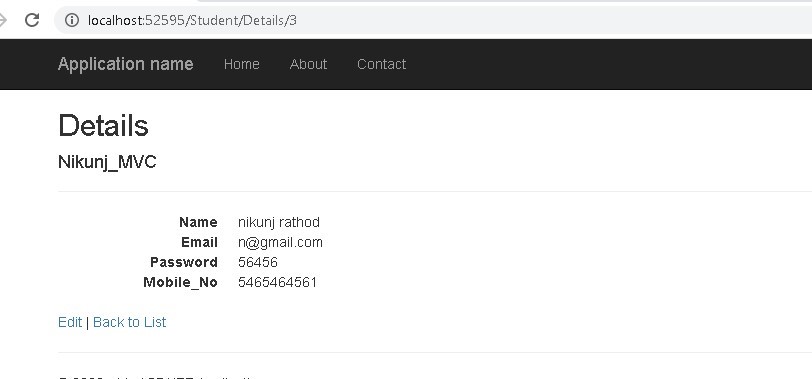
 Details.cshtml
In Views/Home/Details.cshtml, replace the contents of the file with the following code to replace the text about ASP.NET and MVC with text about this application:
@model Nik_mvc.Models.Nikunj_MVC
@{
ViewBag.Title = “Details”;
Layout = “~/Views/Shared/_Layout.cshtml”;
}
<h2>Details</h2>
<div>
<h4>Nikunj_MVC</h4>
<hr />
<dl class=”dl-horizontal”>
<dt>
@Html.DisplayNameFor(model => model.Name)
</dt>
<dd>
@Html.DisplayFor(model => model.Name)
</dd>
<dt>
@Html.DisplayNameFor(model => model.Email)
</dt>
<dd>
@Html.DisplayFor(model => model.Email)
</dd>
<dt>
@Html.DisplayNameFor(model => model.Password)
</dt>
<dd>
@Html.DisplayFor(model => model.Password)
</dd>
<dt>
@Html.DisplayNameFor(model => model.Mobile_No)
</dt>
<dd>
@Html.DisplayFor(model => model.Mobile_No)
</dd>
</dl>
</div>
<p>
@Html.ActionLink(“Edit”, “Edit”, new { id = Model.id }) |
@Html.ActionLink(“Back to List”, “Index”)
</p>
Output
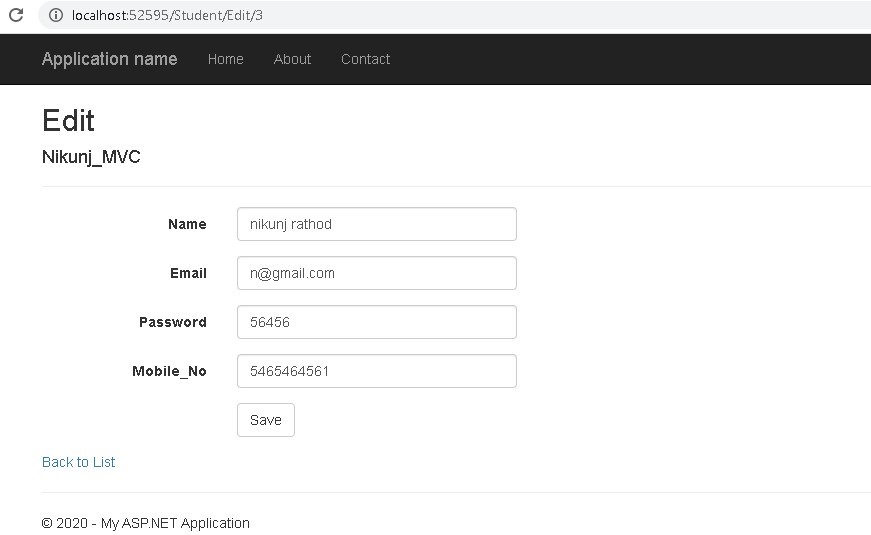
 Edit.cshtml
In Views/Home/Edit.cshtml, replace the contents of the file with the following code to replace the text about ASP.NET and MVC with text about this application:
@using (Html.BeginForm())
{
@Html.AntiForgeryToken()
<div class=”form-horizontal”>
<h4>Nikunj_MVC</h4>
<hr />
@Html.ValidationSummary(true, “”, new { @class = “text-danger” })
@Html.HiddenFor(model => model.id)
<div class=”form-group”>
@Html.LabelFor(model => model.Name, htmlAttributes: new { @class = “control-label col-md-2” })
<div class=”col-md-10″>
@Html.EditorFor(model => model.Name, new { htmlAttributes = new { @class = “form-control” } })
@Html.ValidationMessageFor(model => model.Name, “”, new { @class = “text-danger” })
</div>
</div>
<div class=”form-group”>
@Html.LabelFor(model => model.Email, htmlAttributes: new { @class = “control-label col-md-2” })
<div class=”col-md-10″>
@Html.EditorFor(model => model.Email, new { htmlAttributes = new { @class = “form-control” } })
@Html.ValidationMessageFor(model => model.Email, “”, new { @class = “text-danger” })
</div>
</div>
<div class=”form-group”>
@Html.LabelFor(model => model.Password, htmlAttributes: new { @class = “control-label col-md-2” })
<div class=”col-md-10″>
@Html.EditorFor(model => model.Password, new { htmlAttributes = new { @class = “form-control” } })
@Html.ValidationMessageFor(model => model.Password, “”, new { @class = “text-danger” })
</div>
</div>
<div class=”form-group”>
@Html.LabelFor(model => model.Mobile_No, htmlAttributes: new { @class = “control-label col-md-2” })
<div class=”col-md-10″>
@Html.EditorFor(model => model.Mobile_No, new { htmlAttributes = new { @class = “form-control” } })
@Html.ValidationMessageFor(model => model.Mobile_No, “”, new { @class = “text-danger” })
</div>
</div>
<div class=”form-group”>
<div class=”col-md-offset-2 col-md-10″>
<input type=”submit” value=”Save” class=”btn btn-default” />
</div>
</div>
</div>
}
<div>
@Html.ActionLink(“Back to List”, “Index”)
</div>
Output
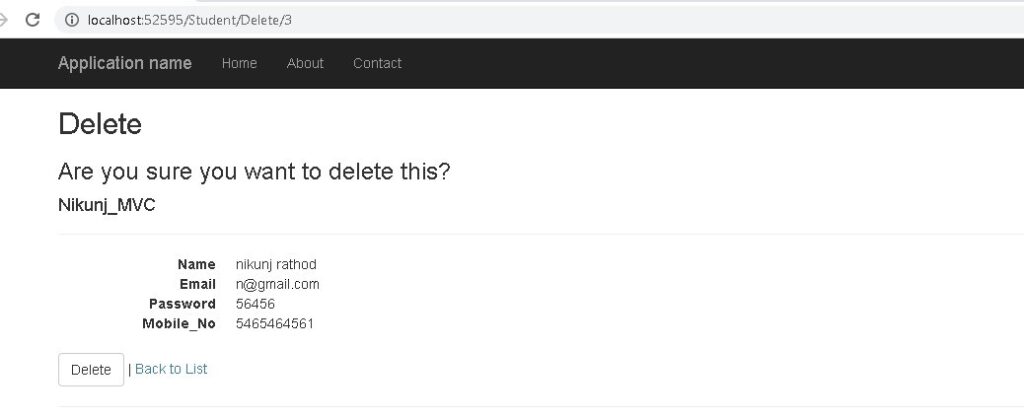
 Delete.cshtml
In Views/Home/Delete.cshtml, replace the contents of the file with the following code to replace the text about ASP.NET and MVC with text about this application:
@model Nik_mvc.Models.Nikunj_MVC
@{
ViewBag.Title = “Delete”;
Layout = “~/Views/Shared/_Layout.cshtml”;
}
<h2>Delete</h2>
<h3>Are you sure you want to delete this?</h3>
<div>
<h4>Nikunj_MVC</h4>
<hr />
<dl class=”dl-horizontal”>
<dt>
@Html.DisplayNameFor(model => model.Name)
</dt>
<dd>
@Html.DisplayFor(model => model.Name)
</dd>
<dt>
@Html.DisplayNameFor(model => model.Email)
</dt>
<dd>
@Html.DisplayFor(model => model.Email)
</dd>
<dt>
@Html.DisplayNameFor(model => model.Password)
</dt>
<dd>
@Html.DisplayFor(model => model.Password)
</dd>
<dt>
@Html.DisplayNameFor(model => model.Mobile_No)
</dt>
<dd>
@Html.DisplayFor(model => model.Mobile_No)
</dd>
</dl>
@using (Html.BeginForm()) {
@Html.AntiForgeryToken()
<div class=”form-actions no-color”>
<input type=”submit” value=”Delete” class=”btn btn-default” /> |
@Html.ActionLink(“Back to List”, “Index”)
</div>
}
</div>
Output
 Conclusion:
In this Article, we have learned about how practically Asp.Net Core API with Entity Framework mechanism works. It helps in managing the confidential information very efficiently. This approach is simple to learn and believe me once you get familiar with the process and how it works, you can literally play with the development.


