


Goods and Services Tax completely reformed the way India pays taxes. There are several changes the GST made to the tax system that there was some confusion initially about the tax framework. There is significant use of technology. It created efficiency and transparency to a great extent with the intuitive interface built by the cutting edge technology used in the GST portal. An individual can file returns, pay taxes, keep records, verify GSTIN and other tax needs all through just a mobile phone or a laptop from the comfort of home or office. A taxpaying individual can also upload invoices with ease through the portal. GST invoices can be created through online and offline GST billing software that provides an efficient platform for experts and novices. There are options to not only automate invoices but also to authenticate with a digital signature. The Emsigner for GST is a seamless web-based software service that helps an individual to authenticate their documents.
Invoice under GST
There is no set format for creating GST compliant invoice, but there are few popular invoice formats that are used by all the invoice software to bring efficiency. One of the most popular methods to create an invoice is through Microsoftware Excel software. Here is a step – by – step guide to creating a GST invoice in Excel.
Step 1: Open the Microsoft excel software and click the “File” Tab on the top left corner of the screen. From the drop-down menu click “New” then double-click on the “Blank workbook” option to open a new excel sheet.
Step 2: Remove gridlines by clicking on the “View” tab then uncheck the “Gridlines” option in the “Show/Hide” menu.
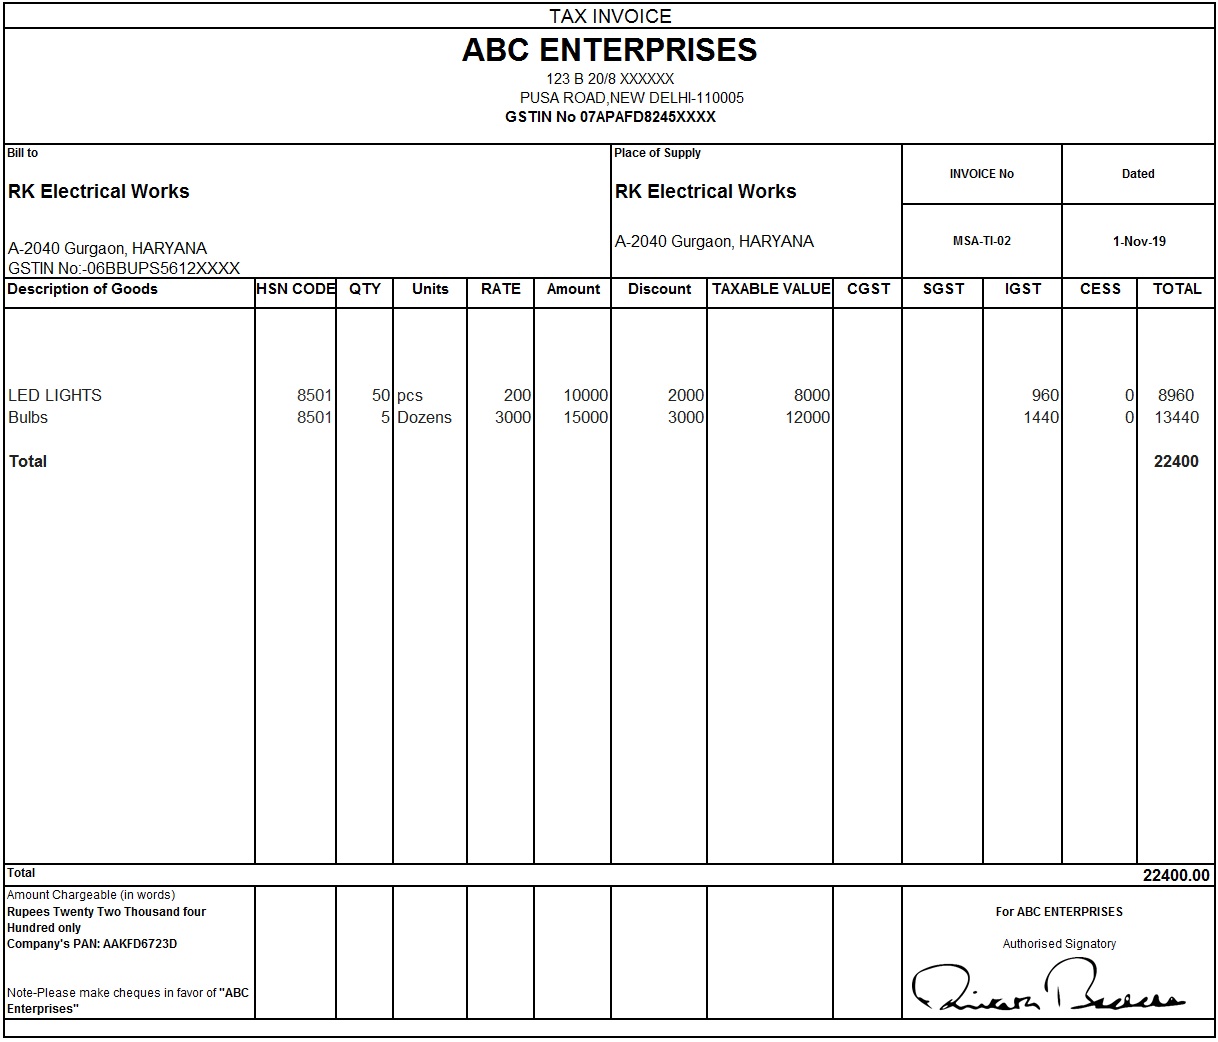
Step 3: In the blank worksheet, click on the “Insert” tab from the top bar and upload the logo of your company in the worksheet through the space provided. Assign the header of the document as the “Tax Invoice”.
Step 4: After including the logo and placing the heading, enter all the details of your company, such as Name of the company, location and address, zip code and the GSTIN.
Step 5: Write “Bill to” below your company details then enter all the customer information like the Name of the customer’s company, their address and location, zip code and their GSTIN/UIN. This will be your “Bill to” section containing all the customer details.
Step 6: Enter all the other details such as invoice date, invoice number, purchase order number, and invoice due date. A shortcut formula that can be used in the invoice date section is =TODAY(). It will enter the date of the present day.
Step 7: Add a new section with “Goods and Services” which will include all the details about goods and services such as quantity, discount percentage, rate, tax applicable etc. Different formulas can be used to ease the use of excel.
Step 8: At the end of the invoice, enter your company PAN number, bank details and provide a space to accommodate your digital signature.
As there are flexibility and no particular format the GST portal necessitates, there can be different formats that can be used to create invoices. A lot of small businesses or companies do not have an updated version of Excel. There are times when there might not be the availability of an updated laptop, or there could be unfamiliarity for some with the Microsoft excel. For any of these issues, an invoice can be created through Microsoft Word format too. To for GST invoice in word format follows the following steps:
Step 1: Open Microsoft word and clear any previously saved documents if it automatically opens.
Step 2: On the top left side of the screen, you will be able to see an “Insert” tab click on that and from the drop-down menu, click “Table”. Then click on the “Insert Tables” option and change the number of columns and rows as per your requirement.
Step 3: Adjust the size of each of the columns, depending on the details you require to fill in that particular column. To do that, click on the “Layout” tab then in the “Width” section enter the required value to increase the space of the column.
Step 4: Enter all the details of your company such as Company Name, address and location, Zip code and GSTN.
Step 5: Add all the GST details such as the invoice date, invoice number, purchase order, invoice due date etc.
Step 6: Enter all the customer details such as their company name, address and location, Zip code, UIN/GSTIN etc.
Step 7: Create a new section that describes the services provided or goods supplied below the customer details. Enter details such as rate, quantity, total amount, total units, HSN/SAC codes, GST rates applicable Etc.
Step 8: Add bank details at the end of your invoice such as bank name, bank account number, IFSC code of the bank etc.
Step 9: Create a section to accommodate the signature to authenticate the invoice.
Software for GST invoices
Apart from the above manual ways to create GST invoice, there is various software that can help you create invoices in a much more efficient manner. Some popular invoice software is Profitbooks, Zoho Invoice, QuickBooks, Tally ERP 9, Vyapar, Invoicely, HyperDrive HDPOS Smart, etc. Using software to create GST invoices not only helps save time, but it also helps in avoiding mistakes. This software also has the option to perform calculations automatically, keep records, track credits issued, track expenses etc.
Conclusion
GST billing software is easy-to-use and mandatory for any business, big or small. It removes the tedious task of entering values manually or creating different sections and columns. It is also easy to authenticate documents using this software. Emsinger for GST is a software that is available on the GST portal. It is one of the most important software that can be used to authenticate your documents. With good software for invoicing and authenticating documents, you can better focus on business and remain GST compliant effortlessly.


")


