What is Asp.net Core?
- Asp.net Core is a cross platform, high-performance, and open-source framework for building modern, cloud-enabled, internet-connected applications.
- Asp.net Core supports creating RESTful services also called as web API.
- With Asp.net Core cross-platform you can build any type of applications like,
- Desktop Application,
- Mobile Application,
- Cloud, IOT Application,
- Gaming Application etc.
What does Asp.net Core support?
- Asp.net Core supports the JavaScript Framework, Cross-platform supports, In-built Dependency Injection, MVC Architecture and Razor.
- Cross-platform supports means you can deploy your project to Windows, Mac, and Linux.
- So there’s the slogan “Write once, Run anywhere”.
- Asp.net Core supports MVC architecture and the CLI tool also. Both MVC controller class and API controller class inherits from same controller base class and returns IActionResult. And .net Core Provides CLI tool which support platform like Windows, Mac, and Linux.
What is Middleware?
- Asp.net Core provides modularity with the middleware component.
- Asp.net Core introduced the new concept of Middleware. Middleware is just a class which is executed on every request in Asp.net Core application. Middleware is similar to Http Handlers and Http Modules where both were to configured and executed on every request.
- ASP.NET Core apps can run on .NET Core or on the full .NET Framework.
- It was built to provide an optimized development framework for apps that are deployed to the cloud or run on-premises.
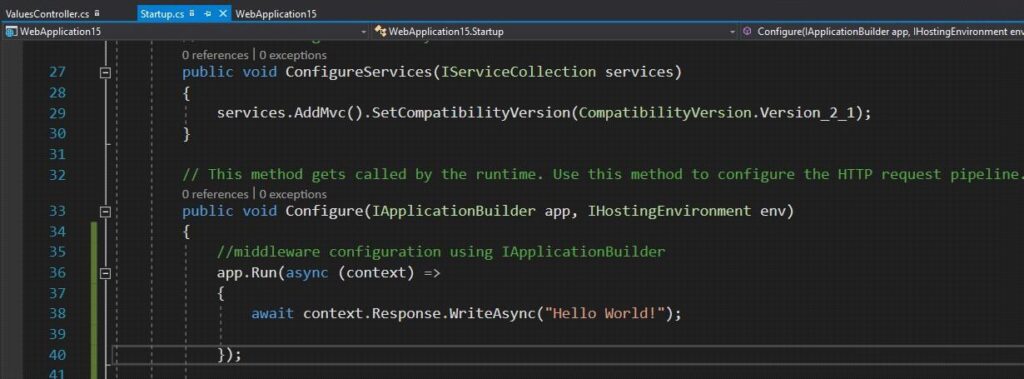
- As you can see in above example, Run() is an extension method on IApplicationBuilder instance which adds the middleware to application’s pipeline and it’ll returns the response with “Hello World”.

- After run the program it’ll display output like above example.
What is Authorization and Authentication?
- Now let’s talk about Authorization and Authentication.
- Authentication is the process of verifying who the user is. The authentication process is similar to accessing a website, it will take your name and password to verify that you are allowed to access the website or not.
- While Authorization is the process of verifying what they have access to. Authorization process gives permission to those users who can access to particular resource. Consider there are two role admin and user. Now admin have authorized to add user, delete user, edit user etc. But user can’t have these types of authorization.
What is JWT?
- I have used the authorization using JWT. JWT means JSON Web Token which is used to create access tokens for application. This token is created using HMAC algorithm and create public/private key pair.
Example:
- Let’s have a look on example.
- Step :- 1
- Create new project,
File -> New -> Project -> Web -> Asp.net core web application -> API.
- Step :- 2
- Download this Packages :-
- Swashbuckle.AspNetCore
- Microsoft.AspNetCore.App
- Microsoft.AspNetCore.Authentication.JwtBearer From nuget package.
- Swash buckle is an open-source project for generating Swagger documents for Web APIs that are built with ASP.NET Core.
- Step :- 3
- Now add these three methods to startup.cs file.
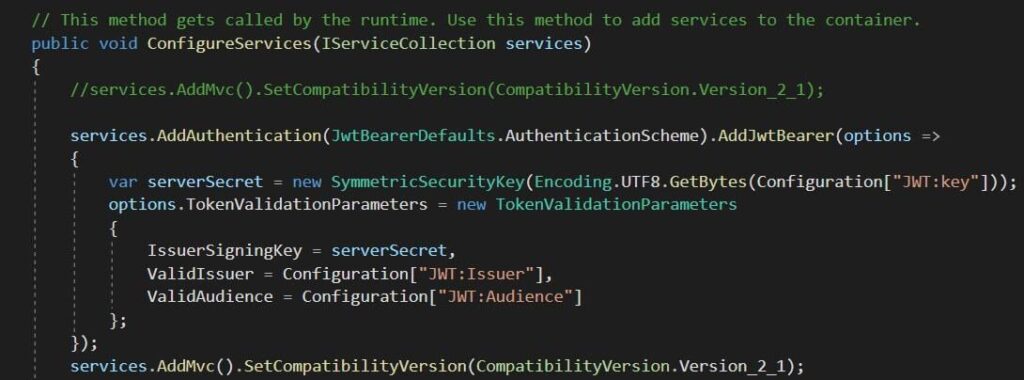
- At the runtime start up file will be called first.
 And Configure Services method used to add services to the container. This method will introduce the JWT Bearer authentication.
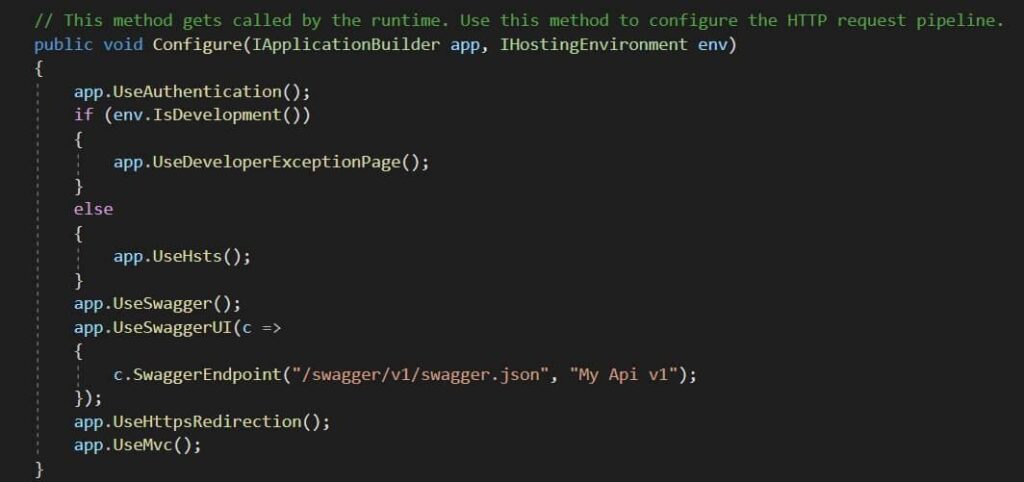
- After that add this method to display the the default UI swagger on browser.
- You can add description as per you desired.
- This method configure the HTTP request pipeline.
- This method will enables the swagger and jwt bearer token.
- Step :- 4

- Now add this to appsettings.json. Here you can add secret key, Issuer and Audience.
- You can add key as per you wish. I’ve taken the simple string.
- Step :- 5
- Now add controller called Token. Which will generates tokens and authorize the user.
- Add this below action method to token controller.
- Create Token method creates token when you enter the name and password in the swagger UI.
- In Create Token method it will call the Build Token and Authenticate method which is printed below.
- Now in Build Token method this will uses the JWT key and perform the HMC SHA algorithm to generate encrypted token.
- And Authenticate method is used to check the user is authenticated or not. You can add your name and email. Also can change the username and password as you wish.
- After all I have written the two class login model and user model.
- Step :- 6
- There is the default controller is value controller. I have written the code in it so we can get the value of book class.
- Add this method to value controller.
- Make a Book class, in which there is two strings: Author and Title and one bool: age restriction.

- We have create the Book list to make a list of book title and book author.
- Now we have taken the authorize data annotation to access this get method only to the authorized person.
- It will check for the current user and add author and title of the book in the list and return the list.
- Step :- 7
- Right click on project, go to properties and in debug as shown above snap.

- Now we have to run the project in swagger so change in launch browser and write here the swagger.
- It will tells the project to run in swagger.
- Now run the program and it will shows the swagger UI.
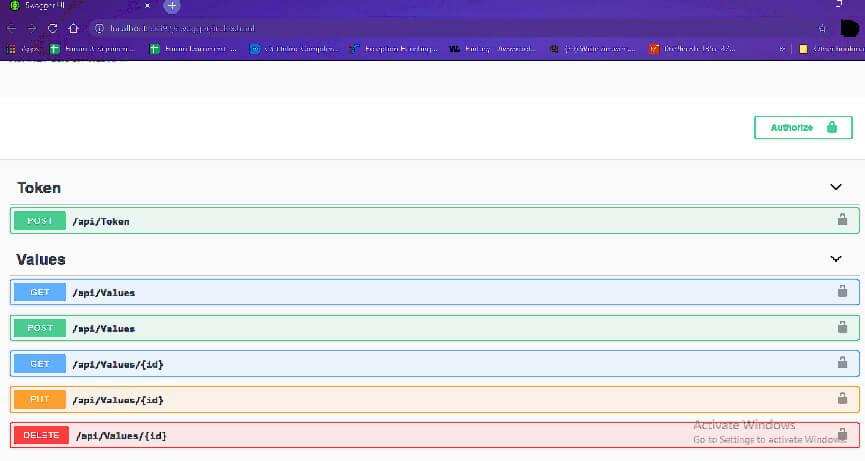
- Output :-

- Now click on token to generate token to authenticate. It will looked like this.
- Create token using user name and password.
- After run project it will be looked like below snap.
- After adding username and password it will generates the token, copy it without quotes (“”) and place it in authorization button as below.
- Before you paste the token make sure you have to write the “Bearer” before it.
- And then your token will be place after it. Now click authorize button and you will be authorized person. So you can access the methods of another controller also.
- Now click on get of the value controller. Click on try it out and execute it.
- It will display like as you have written in the value controller.
- Summary
-
- We have just get the book list using the JWT Authorization.
- You can add your own description in startup code file.
- So we got the Book list using JWT Authentication and Authorization in Asp.net Core Api.


